

This was going to be a review but I was unable to get Elephant to work so this post will be about my experiences trying to work with this new app.
Elephant 2.0 is a syncing program for your PC. It is supposed to sync your music, pictures, video, homebrew, and ISOs. The app installed easily and the configuration is fairly straight forward. Input the path to your folders for music, pictures, etc. and Elephant should be able to see the contents. After I configured Elephant, it popped up a window saying that it couldn't find my picture, video, or ISO folders and that it would create them. It didn't ask if it could create them, it just said it was going to and gave me an OK button (see screen shot below). Creating the ISO folder wasn't a problem because I didn't have one. Creating the video folder had no effect on my memory stick. I can't even be sure that it tried to create the video folder. Although, creating the new picture folder overwrote my existing one. Yes, I did have a picture folder which contained 6 pictures and now my folder is empty. This isn't that big a problem because I keep a current backup of my memory stick on my PC since I am always testing new homebrew. I will say that this is bad behavior on Elephant's part. It should never change/create anything on my PSP without giving me a choice. It is irritating that my picture folder was there and Elephant was unable to find it so it overwrote it.
After that problem I didn't have high hopes for the app. It met these hopes by not doing anything that comes close to syncing. I was unable to get it to recognize or display the files on my PSP and couldn't figure out how I was supposed to create a list/folder for new items I want to put onto my PSP. There is no documentation which explains how Elephant is supposed to work which is also an annoyance.
I would steer clear of this app until the next version and if you decide to try it then, please backup your memory stick.
Saturday, March 15, 2008
Elephant 2.0
Saturday, March 1, 2008
Despertar del Cementerio v4 Install and Pandora Battery Creation Guide
I have finally caught up with the masses. I now have a DCv4 memory stick and Pandora battery. I know that I am way behind in creating these but I didn't have a spare battery to use. Anyway, here is a little guide on how I created the memory stick and battery:
Creating Pandora Battery:
I used the BatTool v0.5 for 3.XX to create my Pandora Battery. It is easy to use, reversible, and allows you to dump the eeprom.
- Connect your PSP to your PC with a USB cable and enable USB mode.
- Extract the archive and place the "BatTool 0.5 for 3.xx kernel" folder in your GAME folder.
- Exit USB mode and go to the memory stick under Game in the XMB and run BatTool. There are several menu options, pick the one you want.
- Assuming you want a Pandora battery for future unbricking/updating then switch you battery over to service mode and then it'll be ready.
Installing DCv4:
There are many installers available which will automatically install all the files needed to create a "magic memory stick" but I decided to do it the old fashioned way.
You will need these files:
Here is what DCv4 looks like after extracted:
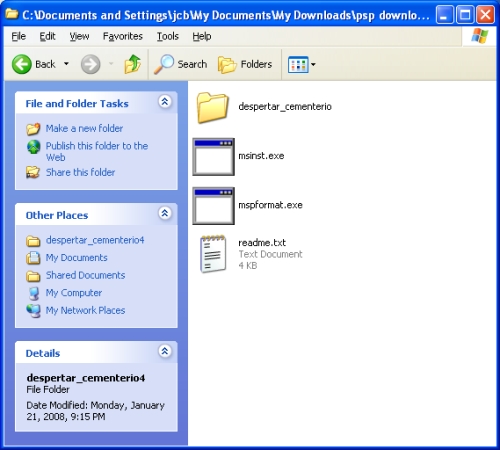
It would be a good idea to follow along with the readme file Dark AleX has provided in DCv4. His "readme" is complete but not as noob friendly as I hope this guide will be.
- Insert the memory stick you want to install DCv4 into your PSP. We need to format it so go to Settings, System Settings, Format Memory Stick and format it.
- Next connect your PSP to your PC with the USB cable and enable USB mode.
- Open a Command Prompt (CP). Drag and drop mspformat.exe into the CP window. Hit the space bar and type the letter of the drive which is your PSP's memory stick and hit enter. It will ask if you want to continue and press y (no space this time).
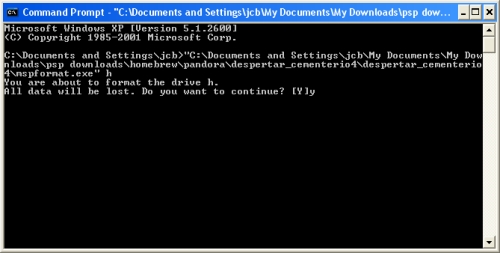
- Remove the memory stick, disable USB mode, re-enable USB mode, and re-insert your memory stick.
- Next create a "PSP" folder on your memory stick. Inside the "PSP" folder, create another folder named "GAME".
- Copy the despertar_cementerio file into the GAME folder. Also copy the 1.5, 3.40, and 3.80 eboots into the root of the memory stick. Rename the eboots 150.PBP, 340.PBP, and 380.PBP respectively.
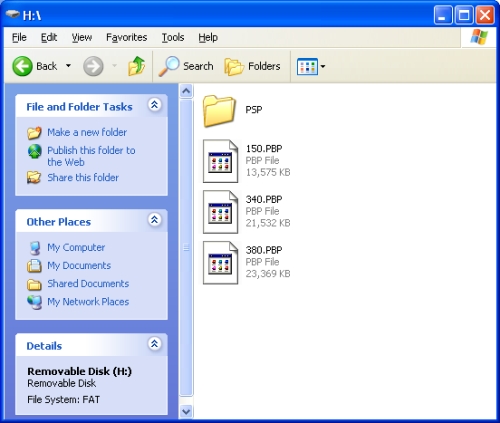
- Disable USB mode again and also disable any PTF custom themes you are running on your PSP.
- Now go to your memory stick under Game and run DCv4. Follow it's directions and after it has completed you will have msipl.bin in the root of your memory stick. Copy this to your PC somewhere you can find it easily, we'll be using it in a second.
- Open up the Command Prompt again. Drag and drop msinst.exe into the CP window and hit the space bar. Type the letter of your PSP's memory stick again and hit the space bar again. Now drag and drop msipl.bin file into the CP window and hit enter. It will ask if you are sure and type y (no space) and hit enter.
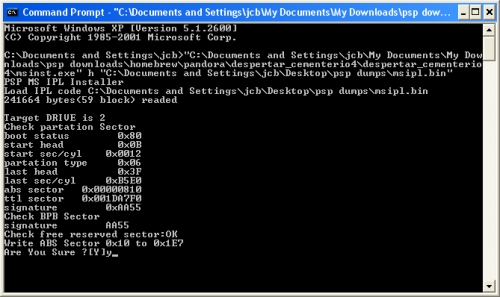
You can delete the 150.PBP and 340.PBP files, they are of no more use. Leave the 380.PBP because it is used when unbricking/updating.
You now have a DCv4 unbricker/updater memory stick.
Using DCv4/Pandora:
If your PSP's power cord is attached then unplug it. Insert the memory stick in which you installed DCv4 then insert the Pandora battery. The PSP will power-on automatically and give you a menu:
- Press X to install 3.80M33.
- Press O to install original 3.80
- Press [] to dump nand to nand-dump.bin. When done, psp will auto shutdown.
- Press L+R+HOME+START to restore nand from nand-dump.bin
Hope this guide was helpful.
Saturday, February 16, 2008
PSP-280 Stamina Battery Pack 3.6v 2200 mah Unboxed

For many of you this won't be big news. It will probably be old news in fact but I just received my new 2200 mah PSP battery and thought that people who are new to the homebrew scene may find it interesting. Here are the unboxing pics (click to enlarge all images in this post):


This will become my primary battery and my original (1800 mah) battery will become my Pandora battery along with my 1 gig memory stick. I realize that it am really late to the Pandora party but I wanted to explain a little about these batteries here and I will be making another post in the near future about how I made my Pandora battery/memory stick. Here is my original battery:

There is a lot of confusion about exactly which batteries can be used for Pandora. Here is an ongoing list/thread about which brands and models are Pandora compatible. Post #66 from the thread talks about this exact battery, and says that it works for Pandora.
As you can see in the pic above, I was able to find what I believe is a genuine Sony PSP-280 battery made in China. If this is a fake then the "pirates" creating these are very talented because I can not find anything that makes me believe it is not a genuine Sony product. I bought it from Amazon here
I hope this helps any of you who are considering buying a new battery and need it to be Pandora compatible. This battery is more expensive than many others but I would rather spend the money on the battery I know I want than gamble on whether the cheap one can be Pandora-ized.
Sunday, January 6, 2008
16 GB Memory Stick Pro Duo coming in March
I've been waiting for the 16GB MS to be released. No, I won't be paying the $300 price tag for it, I am just hoping that this will drive down the price of the 8 GB MS


